Verify SDK for Android and iOS
In this comprehensive guide, we'll navigate you through the essential steps to kickstart your journey with the Verify SDK on Mobile native apps.
Mobile librairies


Android
Add package
To add the Verify SDK to your Android project, follow these steps:
Step 1. Add the JitPack repository to your build.gradle(.kts) file or settings.gradle(.kts)
allprojects {
    repositories {
        ...
        maven { url 'https://jitpack.io' }
    }
}
Step 2. Add the dependency
dependencies {
    ...
}
The Basics
Compose
Verify SDK provide a simple way to use our service with Android Compose. Just call the VerifyView composable function. A session ID is required.
Kotlin Usage:
VerifyView(
	sessionId = "...",
	lang = VerifyLang.FRENCH,
	tier = "...",
	onReady = {
		...
	},
	onFinish = {
		...
	}
)
Attributes list
| Name | Type | Default | Required | Description |
|---|---|---|---|---|
sessionId | string | '' | Yes | Session can be referred as a customer verification session. More info |
lang | VerifyLang | VerifyLang.ENGLISH | No | Event listener called on every open/close action |
tier | string | null | No | Tier is a simply way to divide your workflow into small pieces. It is very useful when you offer different features based on the verification level of your customer. More info |
onReady | () => Void | null | No | Event listener called when the page is fully loaded |
onFinished | () => Void | null | No | Event listener called when the user finished verification |
Activity (view legacy)
If you're less familiar with compose, you can use our service by calling an Android Activity.
First, you need to add VerifyActivity in your Android Manifest:
<activity
	tools:ignore="LockedOrientationActivity"/>
Attributes list
| Name | Type | Default | Required | Description |
|---|---|---|---|---|
sessionId | string | '' | Yes | Session can be referred as a customer verification session. More info |
lang | VerifyLang | VerifyLang.ENGLISH | No | Event listener called on every open/close action |
tier | string | null | No | Tier is a simply way to divide your workflow into small pieces. It is very useful when you offer different features based on the verification level of your customer. More info |
Kotlin Usage:
val intent = Intent(this, VerifyActivity::class.java)
intent.putExtra("sessionId", "...")
intent.putExtra("lang", VerifyLang.ENGLISH)
intent.putExtra("tier", "...")
startActivity(intent)
Android Jetpack Navigation
<argument
	app:argType="string" />
<argument
	app:argType="io.synaps.sdk.core.VerifyLang" />
<argument
	app:argType="string"/>
Languages available
- en - English
- fr - French
- de - German
- es - Spanish
- it - Italian
- ja - Japanese
- ko - Korean
- pt - Portuguese
- ro - Romanian
- ru - Russian
- tr - Turkish
- vi - Vietnamese
- zh-CN - Simplified Chinese
- zh-TW - Traditional Chinese
iOS
Add package
- CocoaPods
- Carthage
- Swift Package Manager
pod 'SynapsVerify'
github "synaps-io/ios-verify"
dependencies: [
    .package(url: "https://github.com/synaps-io/ios-verify", from: "0.0.6")
]
Usage
You must first Init a new session using your backend and fetch it using your private authenticated API. You will then need to replace: self.$sessionId by the initialized session ID.
- Swift UI - Individual (KYC)
- Swith UI - Corporate (KYB)
...
@State private var sessionId = ""
var body: some View {
    ...
    Synaps(sessionId: self.$sessionId,
                   primaryColor: .blue,
                   secondaryColor: .white, ready: {
                       print("ready")
                   }, finished: {
                       print("finished")
                   })
    ...
...
@State private var sessionId = ""
var body: some View {
    ...
    Synaps(sessionId: self.$sessionId,
                   primaryColor: .blue,
                   type: "corporate",
                   secondaryColor: .white, ready: {
                       print("ready")
                   }, finished: {
                       print("finished")
                   })
    ...
Properties
sessionId string
Unique verification session identifier
type string
- individual for KYC (default)
- corporate for KYB
ready() callback
Called when SDK is ready
finished() callback
Called when user finishes the verification process
lang string (optional)
User language preference
- en - English
- fr - French
- de - German
- es - Spanish
- it - Italian
- ja - Japanese
- ko - Korean
- pt - Portuguese
- ro - Romanian
- ru - Russian
- tr - Turkish
- vi - Vietnamese
- zh-CN - Simplified Chinese
- zh-TW - Traditional Chinese
tier string (optional)
Tier ID
2. StoryBoard
How to setup it
The library allows you to use all the features of standard View with a lot of new cool features, customizable from Storyboard or from code.
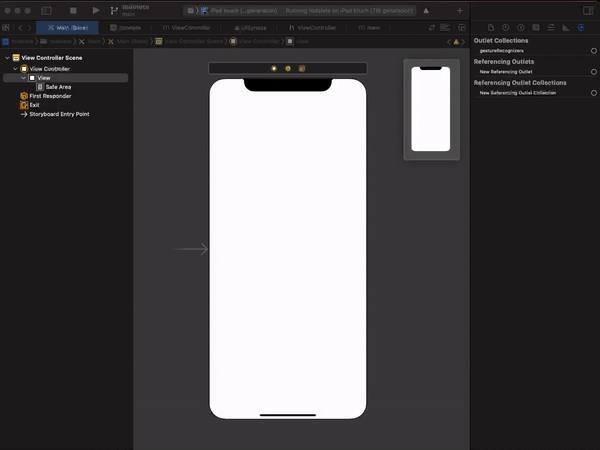
First of all, drag & drop a new View inside your view controller in storyboard.
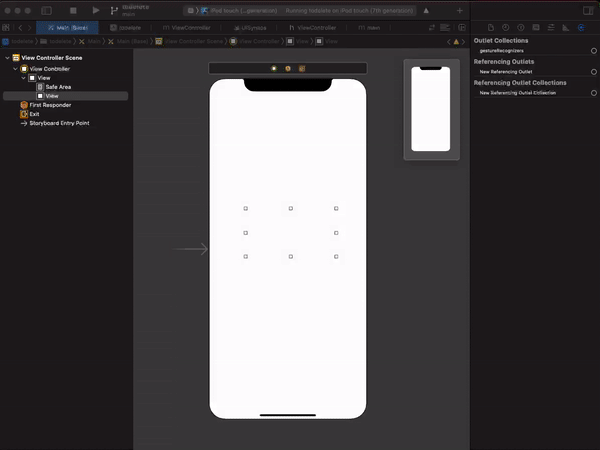
Then set the View class to UISynapsIndividual or UISynapsCorporate
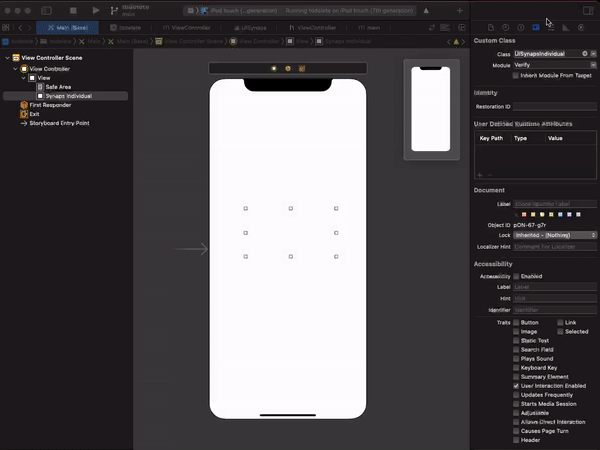
Now you are ready to customize your UISynapsIndividual or UISynapsCorporate from the Attributes Inspector of Interface Builder.
Attributes
lang string (optional)
User language preference
- en - English
- fr - French
- de - German
- es - Spanish
- it - Italian
- ja - Japanese
- ko - Korean
- pt - Portuguese
- ro - Romanian
- ru - Russian
- tr - Turkish
- vi - Vietnamese
- zh-CN - Simplified Chinese
- zh-TW - Traditional Chinese
tier string
Tier ID
3. How to launch it
Make sure to replace your SESSION_ID by a session_id fetch from your
backend API.
- Swift
- Objective C
import SynapsVeriy
import AVFoundation
class ViewController: UIViewController {

    @IBOutlet var synaps : UISynapsIndividual!
    override func viewDidLoad() {
        super.viewDidLoad()
        ...
    }
     func yourSessionHandler() {
        switch AVCaptureDevice.authorizationStatus(for: .video) {
            case .authorized:
            synaps.sessionId = SESSION_ID
            case .notDetermined:
                AVCaptureDevice.requestAccess(for: .video) { granted in
                    if granted {
                        self.synaps.sessionId = SESSION_ID
                    }
                }
           ...
        }
    }
...
#import <AVFoundation/AVFoundation.h>
...


@property (weak, nonatomic) IBOutlet UISynaps *synaps;
...
@end

@implementation ViewController


...
- (IBAction)onButtonClicked:(id)sender {
    AVAuthorizationStatus status = [AVCaptureDevice authorizationStatusForMediaType:AVMediaTypeVideo];

    if(status == AVAuthorizationStatusAuthorized) {
        self.synaps.sessionId = SESSION_ID;
    }
    else if(status == AVAuthorizationStatusNotDetermined){

        [AVCaptureDevice requestAccessForMediaType:AVMediaTypeVideo completionHandler:^(BOOL granted) {
            if(granted){
                self.synaps.sessionId = SESSION_ID;
            } else {
            }
        }];
    }
    ...
}

@end
Now you are ready to listen Synaps event by listening the event Value Changed
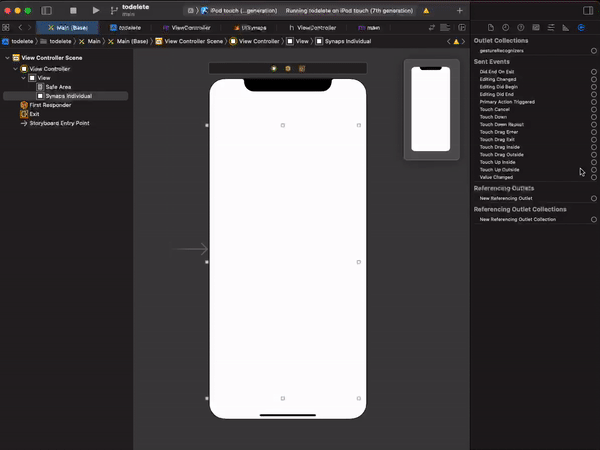
Now you are ready to listen Synaps event by listening the event Value Changed
- Swift
- Objective-C
@IBAction func onStatusChanged(sender: UISynapsIndividual) {
    if self.synaps.status == "ready" {
        ...
    } else if self.synaps.status == "finished" {
        ...
    }
}
...
- (IBAction)onStatusChanged:(id)sender;
...
- (IBAction)onStatusChanged:(id)sender {
    if([self.synaps.status  isEqual: @"ready"]) {
        ...
    } else if ([self.synaps.status  isEqual: @"finished"]) {
        ...
    }
}
...